
종우의 삶 (전체 공개)
Market Project - 3 // Security 관련 정리 본문
Spring Security를 한동안 계속 알아보고 있다.
이번 포스트에서는 다시 한번 Spring Security의 로그인(JWT를 통한 인증, 인가) 과정을 살펴볼 것이다.
Security 자체에서 숨겨진 채로 진행되는 것들이 많다보니 잘 알아차리기 힘들다.
하지만 이 과정을 어느정도 이해할 수 있어야 Spring Security 관련된 기능들을 자유롭게 사용이 가능할 것이다.
1. Spring Security의 인증 과정
우선 Spring Security Authentication (인증) 기본적인 설정은 아래와 같다.
(출처 : https://docs.spring.io/spring-security/reference/servlet/architecture.html#servlet-architecture)
(https://docs.spring.io/spring-security/reference/servlet/authentication/architecture.html)

클라이언트가 인증을 시도할 때 어떠한 단계를 거치는지 알아볼 수 있다.
이는 다른 설정을 추가하지 않은 기본 설정을 보여주는데, 세션과 formLogin을 통해 진행하는 로그인 과정을 JWT로 대체할 것이다.
인증(로그인)의 목적은 Authenticated? 로 표현되는 인증 객체를 얻어내는 것이다.
Spring 내에서 Authentication 객체로 표현되며, 이 객체 안에 자격 증명과 권한이 포함되어 있다. 이 Authentication 객체가 생성되면 이후 JWT 토큰을 생성하여 권한이 필요한 엔드포인트 접근에 사용할 수 있다.
2. 자세한 인증 과정
사용자는 HTTP POST 요청으로 사용자 이름과 비밀번호로 로그인을 시도한다. 여기서는 JSON형태를 썼다.
(프로젝트에서 User를 Customer로 변경했기 때문에 편의상 Customer로 표시함)
e.g)
{
"customerName" : "testUser",
"password" : "password"
}
이후 인증 필터인 UsernamePasswordAuthenticationFilter 가 POST 요청을 감지하여 자격 증명을 추출하고 인증 과정을 시작한다.
여기서는 UsernamePasswordAuthenticationFilter 를 다시 구현한 JwtAuthenticationFilter 를 사용한다.
각자의 프로젝트에 맞는 구현을 하였을 것이다.
JwtAuthenticationFilter.java
public class JwtAuthenticationFilter extends UsernamePasswordAuthenticationFilter {

    private final LoginProvider loginProvider;

    public JwtAuthenticationFilter(LoginProvider loginProvider, LoginSuccessHandler successHandler, LoginFailureHandler failureHandler) {
        super();
        this.loginProvider = loginProvider;
        this.setAuthenticationSuccessHandler(successHandler);
        this.setAuthenticationFailureHandler(failureHandler);
        setFilterProcessesUrl("/api/customer/login");
    }

    @Override //로그인 시도
    public Authentication attemptAuthentication(HttpServletRequest request, HttpServletResponse response)
            throws AuthenticationException {
        try {
            LoginRequestDto loginRequestDto = new ObjectMapper().readValue(request.getInputStream(), LoginRequestDto.class);

            Authentication authentication = new UsernamePasswordAuthenticationToken(
                    loginRequestDto.getCustomerName(),
                    loginRequestDto.getPassword());
            return loginProvider.authenticate(authentication);


        } catch (IOException e) {
            throw new AuthenticationServiceException("로그인 실패", e);
        }
    }
}
위에서 말한대로 이 필터에서는 지정된 url로 들어온 요청을 감지한다.
setFilterProcessesUrl("/api/customer/login")
Override된 attemptAuthentication() 메서드에서 실제로 로그인과정이 진행되는데, LoginProvider 를 주입받고 있기 때문에 LoginProvider를 통해 인증이 진행될 것이다. 이 인증이 성공하면 Authentication 객체가 생성된다.
인증 성공, 실패에 대한 처리를 위해 LoginSuccessHandler 와 LoginFailureHandler 를 적절히 만들어준다.
attemptAuthentication() 메서드에서는
 LoginRequestDto loginRequestDto = new ObjectMapper().readValue(request.getInputStream(), LoginRequestDto.class);

            Authentication authentication = new UsernamePasswordAuthenticationToken(
                    loginRequestDto.getCustomerName(),
                    loginRequestDto.getPassword());
            return loginProvider.authenticate(authentication);
LoginRequestDto를 통해 들어온 요청 값에서 로그인에 필요한 customerName과 password를 추출하여 UsernamePasswordAuthenticationToken을 생성한다.
이후 인증을 시도하기 위해 loginProvider의 authenticate()메서드를 사용하는데,
이 LoginProvider가 다음 과정인 AuthenticationManager 에 포함된 AuthenticationProvider를 구현한 것이다.
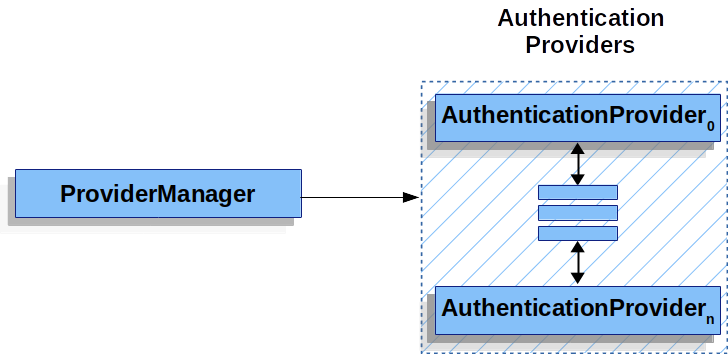
요악하면 인증 요청은 AuthenticationManager로 전달되고,
AuthenticationManager 의 일반적인 구현체인 ProviderManager 는 실제 인증을 수행하는
AuthenticationProvider (LoginProvider)로 위임한다.
그리고 이 AuthenticationProvider (LoginProvider) 는 인증을 수행한 후 Authentication 객체를 반환하게 된다.
->>
AuthenticationManager 를 메인으로, AuthenticationProvider 가 실제 인증을 수행하고 ProviderManager 는 둘 사이의 연결고리로서 여러 AuthenticationProvider 중에서 적절한 인증을 수행할 수 있는 Provider 를 선택하여 인증을 위임한다.
LoginProvider.java
@Component
public class LoginProvider implements AuthenticationProvider {

    private final UserDetailsService userDetailsService;

    public LoginProvider(UserDetailsService userDetailsService) {
        this.userDetailsService = userDetailsService;
    }

    @Override
    public Authentication authenticate(Authentication authentication) throws AuthenticationException {
        String customerName = authentication.getName();
        String password = authentication.getCredentials().toString();

        UserDetails userDetails = userDetailsService.loadUserByUsername(customerName);

        if (new BCryptPasswordEncoder().matches(password, userDetails.getPassword())) {
            return new UsernamePasswordAuthenticationToken(customerName, password, userDetails.getAuthorities());
        } else {
            throw new BadCredentialsException("로그인 실패 " + customerName);
        }
    }

    @Override
    public boolean supports(Class<?> authentication) {
        return UsernamePasswordAuthenticationToken.class.isAssignableFrom(authentication);
    }
}
authenticate() 메서드는 앞서 UsernamePasswordAuthenticationFilter 에서 만들어진 Authentication 객체에서
getName(), getCredentials().toString)() 같은 메서드를 이용해 처음 입력받은
{
"customerName" : "testUser",
"password" : "password"
}
의 값을 가져온다. 이후 UserDetailsService 로 DB에서 사용자 정보를 조회하고 PasswordEncoder도 사용하여 비밀번호가 일치하는지 확인하게 된다. -> 로그인 요청과 DB의 일치 , 인증완료
3. JWT 생성
JwtAuthenticationFilter 에서 인증이 성공하면,
LoginSuccessHandler 로 다음 로직이 넘어간다.
@Component
public class LoginSuccessHandler implements AuthenticationSuccessHandler {
    private final TokenProvider tokenProvider;

    public LoginSuccessHandler(TokenProvider tokenProvider) {
        this.tokenProvider = tokenProvider;
    }

    @Override
    public void onAuthenticationSuccess(HttpServletRequest request, HttpServletResponse response, Authentication authentication) throws IOException {
        String jwt = tokenProvider.createToken(authentication);
        response.setContentType("application/json");
        response.setCharacterEncoding("UTF-8");
        response.getWriter().write("{\"token\":\"" + jwt + "\"}");
        response.setStatus(HttpServletResponse.SC_OK);
    }
}
Spring 내부의 AuthenticationSuccessHandler 를 구현하여
onAuthenticationSuccess() 메서드를 진행한다.
이전 인증에서 받은 Authentication 객체를 이용하여 tokenProvider 에서 createToken() 메서드를 처리한다.
그리고 토큰 값과 응답 몇가지를 보여준다. 응답같은 경우 자유롭게 커스텀하여 사용하도록 한다.
JWT 토큰 생성과정은 생략하기로 한다.
이전 포스트에 이미 설명해 놓았다.
https://jonggae.tistory.com/130
Spring security - 7 // 프로젝트 설명 - 로그인
대상 Repository : https://github.com/Jonggae/security 코드에 대한 코멘트는 commentary 브랜치에서도 확인할 수 있습니다. https://github.com/Jonggae/security/tree/feature/6/commentary 참고자료: 인프런 Jwt 관련 영상 (github
jonggae.tistory.com
TokenProvider.java
@Component
public class TokenProvider implements InitializingBean {

    private final Logger logger = LoggerFactory.getLogger(TokenProvider.class);

    private static final String AUTHORITIES_KEY = "auth";

    private final String secretKey;

    private final long tokenExpirationTime;

    private Key key;

    public TokenProvider(
            @Value("${jwt.secret.key}") String secretKey,
            @Value("${jwt.expiration_time}") long tokenExpirationTime) {
        this.secretKey = secretKey;
        this.tokenExpirationTime = tokenExpirationTime * 1000; //86400초 = 24H
    }

    @Override
    public void afterPropertiesSet() {
        byte[] keyBytes = Decoders.BASE64.decode(secretKey);
        this.key = Keys.hmacShaKeyFor(keyBytes);
    }

    public String createToken(Authentication authentication) {
        String authorities = authentication.getAuthorities().stream()
                .map(GrantedAuthority::getAuthority)
                .collect(Collectors.joining(","));

        long now = (new Date()).getTime();
        Date validity = new Date(now + this.tokenExpirationTime);

        return Jwts.builder()
                .setSubject(authentication.getName())
                .claim(AUTHORITIES_KEY, authorities)
                .signWith(key, SignatureAlgorithm.HS512)
                .setExpiration(validity)
                .compact();
    }
    public Authentication getAuthentication(String token) {
        Claims claims = Jwts
                .parserBuilder()
                .setSigningKey(key)
                .build()
                .parseClaimsJws(token)
                .getBody();

        Collection<? extends GrantedAuthority> authorities =
                Arrays.stream(claims.get(AUTHORITIES_KEY).toString().split(","))
                        .map(SimpleGrantedAuthority::new)
                        .collect(Collectors.toList());

        User principal = new User(claims.getSubject(), "", authorities);

        return new UsernamePasswordAuthenticationToken(principal, token, authorities);
    }

    public boolean validateToken(String token) {
        try {
            Jwts.parserBuilder().setSigningKey(key).build().parseClaimsJws(token);
            return true;
        } catch (io.jsonwebtoken.security.SecurityException | MalformedJwtException e) {
            logger.info("잘못된 JWT 서명입니다.");
        } catch (ExpiredJwtException e) {
            logger.info("만료된 JWT 토큰입니다.");
        } catch (UnsupportedJwtException e) {
            logger.info("지원되지 않는 JWT 토큰입니다.");
        } catch (IllegalArgumentException e) {
            logger.info("JWT 토큰이 잘못되었습니다.");
        }
        return false;
    }
}
어찌되었든 이 TokenProvider를 통해 인증을 통과한 사용자의 정보를 담고있는 JWT 토큰이 생성된다.
이후 요청에 따라 JWT 에 들어있는 사용자 정보를 기반으로 다른 인증들을 처리할 수 있다.
예를들어 일반 Customer로 로그인 시 JWT에는 그 권한 정보가 들어있을 것이고, JWT에서 파싱된 Authentication 객체가 SecurityContextHolder에 저장되어 실행된 스레드 내에서 사용될 것이다.
현재 사용자의 정보도 ContextHolder에 들어있으니 getName등을 통해 얻을 수 있다. (다음 포스트에 자세히 다룸)
Controller, service, entity등은 깃허브를 참고바란다.
https://github.com/Jonggae/market
'개발 > Spring' 카테고리의 다른 글
| Market Project -5 // 예외 처리 (0) | 2024.02.27 |
|---|---|
| Market Project - 4 // 인증 후에는 어떤 것들을 할 수 있는지? (1) | 2024.02.21 |
| Market Project - 2 // Java 문법에 대한 고찰 (Stream, lambda) (0) | 2024.02.07 |
| Market project - 1 // 프로젝트 생성과 회원 가입 - 권한 설정에 관해 (0) | 2024.02.05 |
| Spring security - 7 // 프로젝트 설명 - 로그인 (0) | 2024.02.01 |

